Chef's notes:
The chicken breast is a very popular cut of meat in America. Kids love it and even a lot of adults love it. I even eat them on occasion (why not right?). The only problem is that sometimes chicken breasts are a little on the dry side, or a lot on the dry side if they’re over cooked—which they almost always are. One way to avoid the dry white meat is to brine it for about three to four hours before you cook it. Then the meat will be juicy and tender, even if you do overcook them.
Another way to keep your meat moist is to roast it on the bone. The bone will help to keep the meat from overcooking and drying out. So imagine how good your chicken will taste if you brine a cut of meat on the bone!
Ingredients
- 2 chicken breasts
- 1 cup salt
- ½ cup sugar
- 1 tsp mustard seed
- 1 tsp coriander
- 1 tsp black pepper
- 1 tsp caraway
- 1 bay leaf
- 2 Tbsp lime juice
- 6 cups water
- 3 trays ice cubes
Bone-in Chicken Breasts Brined in Salt, Sugar, Mustard, Coriander, Caraway, and Lime Juice
- Pick up some chicken breasts. There are a few options when deciding what chicken breasts to buy. There are boneless and skinless, boneless with skin, cutlets, and on the bone with the skin intact. The last is what these are, and I recommend getting the same. For roasting purposes it’s always better to have a bone.
- Assemble the brine ingredients. I have assembled here a few very classic brine (or pickle) ingredients. Salt, sugar and water form the base for any brine, and the spices are bonus flavors. The full chicken brine recipe is just to the right, but feel free to substitute a couple of flavors if you like.
- Whisk together sugar/salt and water. This brine recipe should be enough to brine six to eight chicken breasts. Heat the water to a low simmer so that the sugar and salt melt. Then, once the water goes from cloudy to clear, add the spices and remove it from the heat. The heat will also help to release oil and flavor from the spices.
- Break up the whole spices a little. Release more flavor from the spices and herbs by heating them in the simmering water, but you can also get more flavor from the herbs and spices by chopping and/or smashing them a little. You can do this by chopping them a bit in a spice grinder like this or by smashing them in a mortar and pestle.
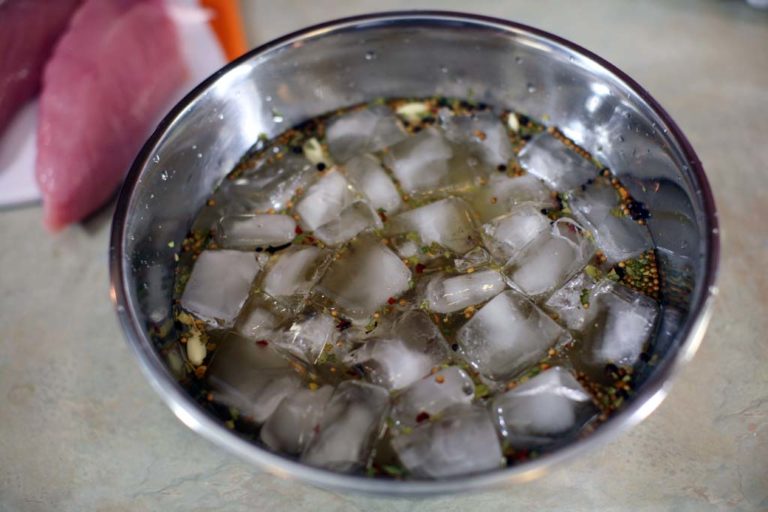
- Cool the brine down with ice. After you’ve mixed the spices into the hot water it’s time to cool it down with ice. I like to mix the brine and ice in a secondary container, so I don’t have to deal with the residual heat of the pan. This is three to four trays of ice cubes from my freezer, which should be enough to cool down six to eight cups of hot brine.
- Pour the brine over the chicken breasts. Once the brine is cool to the touch you may place your chicken breasts in it. Ziploc bags, a large plastic tote, or a cooler work well, but for two to six chicken breasts, this large bowl is sufficient. Brine the chicken breasts for only four to six hours; any longer than that and the flavors will become too strong and overpowering. Also, make sure to keep the chicken breasts between 33 and 40 degrees F while they brine.
Tips & Tricks
- Buy the chicken breasts with the bones in if you plan to roast them after you brine them.
- Buy chicken that smells fresh and looks like it might taste good.
- Use whole spices for brines and break them up a little to release more flavor.
- The lime juice is optional, but I find having a little acid in a brine helps balance the flavors or at least provides a contrast; it may also help to tenderize it a little.
- Heating the water is pretty much essential if you want to get the sugar and salt melted into suspension in the water. Additionally, it will release the flavor from the spices.
- As I said above, a mortar and pestle will also work for crushing the herbs and spices.
- Put the brine and chicken breasts in a safe place and make sure the container you are using does not leak.
